
KORE Aviation - You just bought your first aviation headset. Now what? Plugging it in and getting it working in the cockpit is simpler than you think, but a few details can trip up first-timers. This guide walks you through every step to set up your aviation headset the right way, from unboxing to your first radio call.
Whether you fly a Cessna 172, a Piper Cherokee, or a Diamond DA40, the process is nearly identical. You will be ready to talk to ATC and hear your instructor clearly within five minutes.
What Is in the Box: Know Your Headset Parts

Before you head to the airport, take a few minutes to get familiar with your headset. Every aviation headset has these core parts:
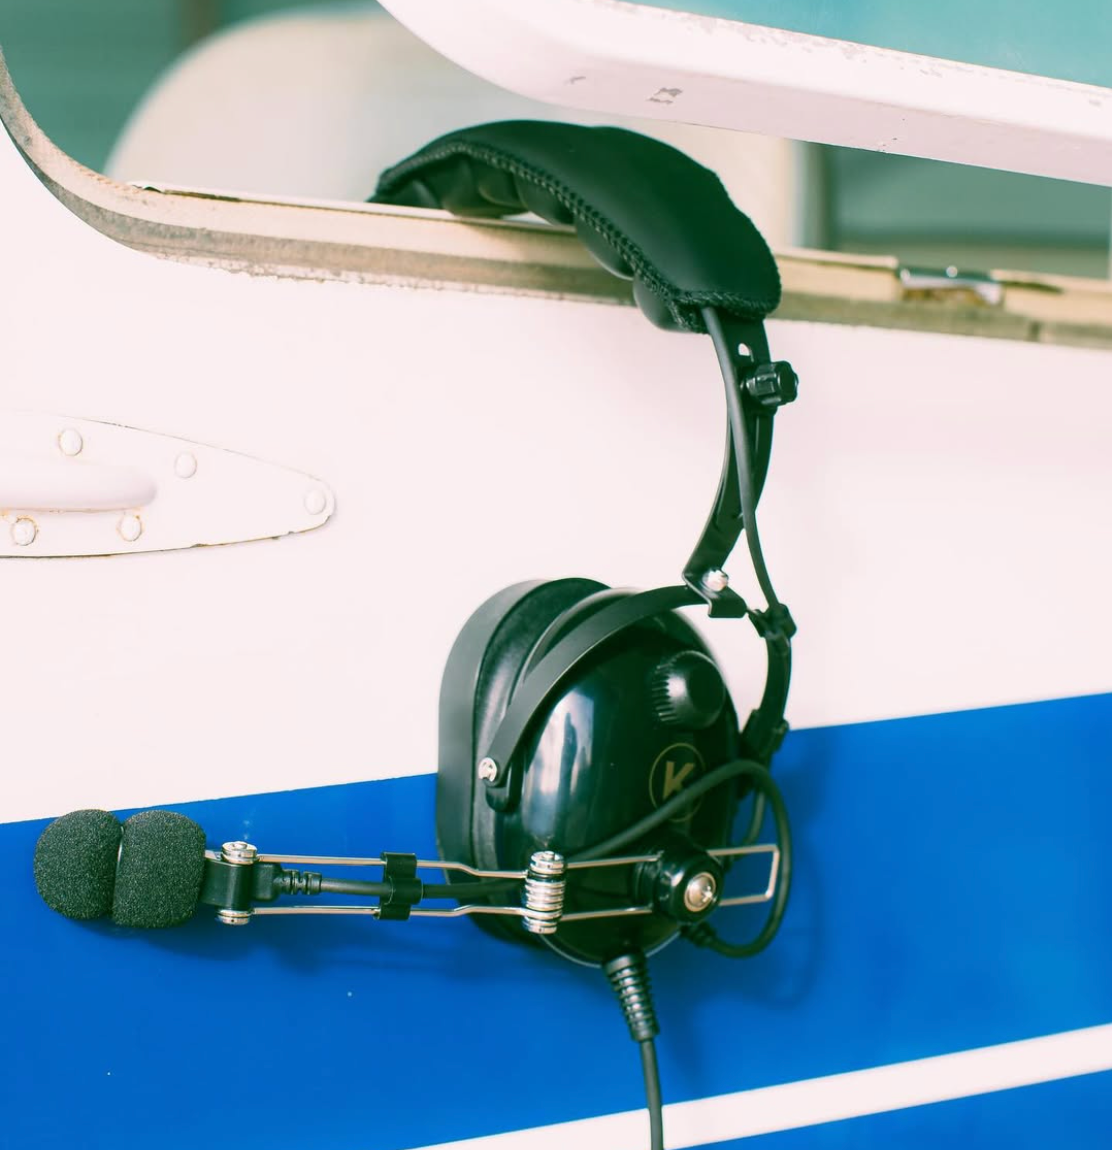
- Ear cups: The padded shells that cover your ears and block cockpit noise. PNR (Passive Noise Reduction) headsets like the KORE Aviation KA-1 ($224.95) use thick padding and a tight seal to reduce noise by 22 to 24 dB.
- Headband: The adjustable band across the top of your head. You can slide each side up or down for a comfortable fit.
- Boom microphone: The arm extending from one ear cup with a small mic at the end. This picks up your voice for radio transmissions.
- Dual GA plugs: Two plugs at the end of the cable. The larger one (PJ-068, 1/4 inch) carries audio to your ears. The smaller one (PJ-055, 3.5mm) carries your voice from the microphone.
- Volume knob: Usually on one ear cup, this controls your headset volume independent of the intercom.
Some headsets also include a mono/stereo switch. For flight training, keep it on mono so you hear all radio calls in both ears.

Step 1: Adjust the Headband Before You Fly
Do this at home, not in a hot cockpit with the engine running. Put the headset on and slide both ear cups until the pads sit fully over your ears. The top pad should rest comfortably on your head without pressing too hard. You want a snug seal around your ears since that is what blocks engine noise.
If you wear glasses, slide the frames through the ear seal gap so the temples sit between the pad and your skin. The KORE Aviation KA-1 comes with gel ear seals that conform around glasses frames, which makes this much easier than foam pads.
Pro tip: Write down your headband setting (count the notches on each side). This way, if someone else uses your headset, you can reset it instantly.
Step 2: Position the Boom Microphone
The microphone boom should sit on the left side of your face (standard in aviation). Bend the boom so the mic is about two finger widths from the corner of your mouth. It should not touch your lips.
If the mic is too far away, ATC will hear you faintly and ask you to "say again." If the mic is too close, your transmissions will sound distorted and breathy. Two fingers from the corner of your mouth is the sweet spot that most instructors recommend.
The mic capsule itself should point toward your mouth, not away from it. Most aviation mics are noise-canceling electret types that reject sound from the back. If the mic faces the wrong direction, it will pick up engine noise instead of your voice.
Step 3: Plug Into the Cockpit Panel
This is where students often get confused. Here is exactly what to do when you set up your aviation headset in the cockpit:
Look at the instrument panel near the bottom (or on the side panel). You will see two round jacks labeled for each seat position. In a Cessna 172, the pilot jacks are usually on the left lower panel. The instructor or right seat jacks are on the right side.
- Insert the large plug first (PJ-068, 1/4 inch). This goes into the headphone jack (often marked with a headphone icon or "PHONE"). Push it in firmly until it clicks or seats fully.
- Insert the small plug second (PJ-055, 3.5mm). This goes into the microphone jack (often marked with a mic icon or "MIC"). Again, push it in until fully seated.
If the plugs feel loose or wobbly, gently wiggle them and re-seat. A loose connection causes static, crackling, or no audio at all. This is the number one issue students report during their first flights.
Step 4: Set Up the Intercom Panel
The intercom panel (like a Garmin GMA 340/345 or PS Engineering PM3000) controls how audio flows between you, your instructor, and ATC. Here are the key settings to know when you set up your aviation headset for training:
| Setting | What It Does | Recommended Starting Point |
|---|---|---|
| Volume | Controls how loud radio and intercom audio are in your headset | Start at 50% and adjust during engine run |
| Squelch | Filters out background noise from the intercom | Turn up slowly until cockpit noise disappears between conversations |
| Intercom mode | Crew (both seats talk freely) or Pilot Isolate (pilot only) | Set to CREW for dual instruction |
| Marker beacon | Audio markers for instrument approaches | Leave on (your instructor will explain later) |
The squelch setting is the one that confuses most students. If squelch is too low, you hear constant cockpit noise humming through the headset. If it is too high, you might miss quiet radio calls. Start low and slowly increase until the background hum just disappears. Your instructor will help you find the right level during your first flight.
Step 5: Do a Radio and Intercom Check
Before you start the engine, do a quick check with your instructor:
- Intercom check: Say something to your instructor through the intercom. They should hear you clearly without you pressing any button (intercom is always live in CREW mode).
- Volume check: Ask your instructor to speak while you adjust your headset volume knob to a comfortable level.
- Mic check: Once the radio is on, you can check your mic by keying the push-to-talk (PTT) button on the yoke and listening for the "click" sound confirming transmission.
If your instructor cannot hear you, check that the small (mic) plug is fully seated. If you cannot hear them, check the large (audio) plug. Nine times out of ten, a loose plug is the problem.
Step 6: Fine-Tune During Engine Start
Everything changes once the engine starts. A Cessna 172 cockpit runs about 85 to 95 dB at cruise, which is louder than a lawnmower. With a PNR headset like the KORE Aviation KA-1 reducing noise by 24 dB, the cockpit drops to roughly 65 to 70 dB inside your ear cups. That is about the level of a normal conversation.
After engine start:
- Re-adjust volume if needed (engine noise changes the perceived level)
- Re-check squelch (you may need to bump it up slightly with the engine running)
- Listen for any crackling or static (re-seat plugs if present)
- Make sure you can hear ATIS or ground control clearly
Common Headset Setup Mistakes (and How to Fix Them)
After working with student pilots across 50+ flight school partners, here are the most common issues we see:
| Problem | Likely Cause | Fix |
|---|---|---|
| No audio at all | Plugs inserted into wrong jacks | Swap the plugs. Large = headphone, small = mic |
| Can hear but cannot transmit | Mic plug not fully seated | Push the small plug in firmly |
| Constant static or hum | Squelch set too low | Slowly increase squelch until noise stops |
| Audio only in one ear | Mono/stereo switch in wrong position | Switch to mono for GA aircraft |
| Mic picks up engine noise | Boom pointing wrong direction | Rotate mic capsule to face your mouth |
| Headset feels too tight | Headband not adjusted properly | Extend both sides evenly until pressure eases |
| ATC says "unreadable" | Mic too far from mouth | Reposition to two finger widths from mouth corner |
Different Plug Types: GA, Helicopter, and LEMO
Not every aircraft uses the same plug setup. Here is what you need to know:
- Standard GA (dual plug): Two separate plugs (PJ-068 + PJ-055). Used in most training aircraft like Cessna 172, Piper Cherokee, and Diamond DA40. This is what 90%+ of student pilots will encounter.
- Helicopter (U-174): A single plug connector used in rotorcraft. If you are training in helicopters, you need a helicopter-specific headset or an adapter.
- LEMO (6-pin): A single push-connect plug found in newer and more expensive aircraft. LEMO connectors also provide panel power for ANR headsets. Some headsets come with LEMO options or you can buy adapters.
The KORE Aviation KA-1 uses standard GA dual plugs, which work in the vast majority of training aircraft. Over 30,000 pilots fly with KORE Aviation headsets, and most flight schools use GA equipped trainers.
Taking Care of Your Headset After Each Flight
How you set up your aviation headset at the end of the flight matters just as much as the beginning:
- Unplug both connectors gently (pull the plug, not the cord)
- Wipe down ear seals with a damp cloth to remove sweat and oil
- Store in a headset bag or case to prevent scratches and crushing
- Never hang the headset by the boom mic arm
- Keep it out of direct sunlight and extreme heat (like a car dashboard in summer)
Proper storage extends the life of your ear seals by months. Gel ear seals like the ones on the KORE Aviation KA-1 typically last 12 to 18 months with regular care.

Your First Radio Call Checklist
Once your headset is set up and working, here is a quick reference for your very first radio call. Your instructor will guide you, but it helps to know the format:
- Press and hold the PTT button on the yoke before speaking
- Wait one full second before talking (prevents clipping the first word)
- Speak at normal volume and pace (do not shout into the mic)
- Release the PTT button when done (so you can hear the response)
A typical first call to ground control sounds like: "[Airport name] Ground, [Aircraft type] [Tail number], at [Location on field], request taxi to [Runway], with [ATIS information]."
Do not worry about getting it perfect on day one. Every pilot fumbled their first radio call. The headset just needs to work correctly so you can focus on learning.
Frequently Asked Questions
1. Do I need to set up my aviation headset differently for each aircraft?
The basic process is the same for most GA training aircraft. Plug types and jack locations may vary slightly, but dual GA plugs (PJ-068 + PJ-055) work in nearly all Cessna, Piper, and Diamond trainers. The intercom panel layout changes between aircraft models, but volume and squelch adjustments follow the same logic.
2. Why can I hear static when I set up my aviation headset?
Static usually means the squelch is set too low or a plug is not fully seated. Try re-seating both plugs firmly, then slowly turn up the squelch until the noise disappears. If static persists, the jacks in the aircraft panel may need cleaning or maintenance.
3. Can I use my aviation headset with a handheld radio?
Yes, but you need an adapter. Handheld aviation radios typically use a different connector than the cockpit panel. Adapters are inexpensive ($15 to $30) and let you use your full headset with a portable radio for ground operations or backup.
4. How long does it take to set up an aviation headset before each flight?
Once you know the process, about 30 seconds. Plug in both connectors, check your volume and squelch, and you are ready. The first time takes longer because you are learning where everything is, but it quickly becomes second nature.
5. Should I buy my own headset or use the flight school's rental?
Owning your headset means consistent fit, hygiene, and familiarity every flight. Flight school rentals cost $5 to $15 per flight, so a headset like the KORE Aviation P1 ($124.95) pays for itself in about 12 to 25 flights. Plus, you can adjust it once and never fiddle with the settings again.
Bottom Line
Setting up your aviation headset correctly is one of the simplest ways to improve your flight training experience. A properly adjusted headband, correctly positioned microphone, secure plug connections, and well-balanced intercom settings help you hear your instructor clearly, communicate confidently with ATC, and reduce distractions in the cockpit.
Once you've completed the initial setup, the process becomes a quick part of your preflight routine before every lesson. Whether you're just beginning your private pilot training or preparing for more advanced flying, using a reliable headset with the right fit and features can make every hour in the cockpit more comfortable and productive. If you're looking for a headset designed with student pilots in mind, the KORE Aviation KA-1 offers 24 dB of passive noise reduction, standard dual GA plugs, gel ear seals, and a 5-year warranty, making it a dependable companion from your first lesson through the rest of your training.


